This help file covers the following topics:
IFS Document Management is an independent module in IFS Applications, even though it can be integrated easily with any of the other modules. Its main function is to handle and maintain the various types of documentation connected to the other modules in IFS Applications. Below are some requirements and features of the system:
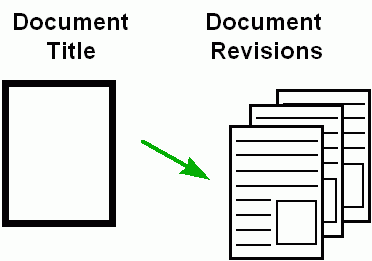
The system focuses on multiple revisions of documents. Properties common to all revisions of the same document are called document titles. The figure below illustrates that one document title can have one or many revisions.
Documents
Documents are often connected to business objects. Business objects are construction articles, work orders, document folders, etc. If a connection to the business object has been created, it is easier to locate the documentation. Launch the business object program from the navigator, then select Attachments from context pane. The Documents will contain the documents connected.
A document folder is a register in which you enter information in order to create document references. This is a method for creating document surveys of folders not directly connected to any of your other business objects.
It is possible to define approval routings for document revisions. This means you can create a list of persons who must electronically sign a document before release.
The documentation can be either stored electronically or printed as paper originals. If you are using Electronic Document Management (EDM), the connection between document references and your application files, such as Word and Excel, will be tight. As a result, you will be able to view or print the documentation with only two or three mouse clicks when you are working with a business object. Another benefit is that you will not have to concern yourself about naming the files or remembering their locations in the File Manager or Explorer.
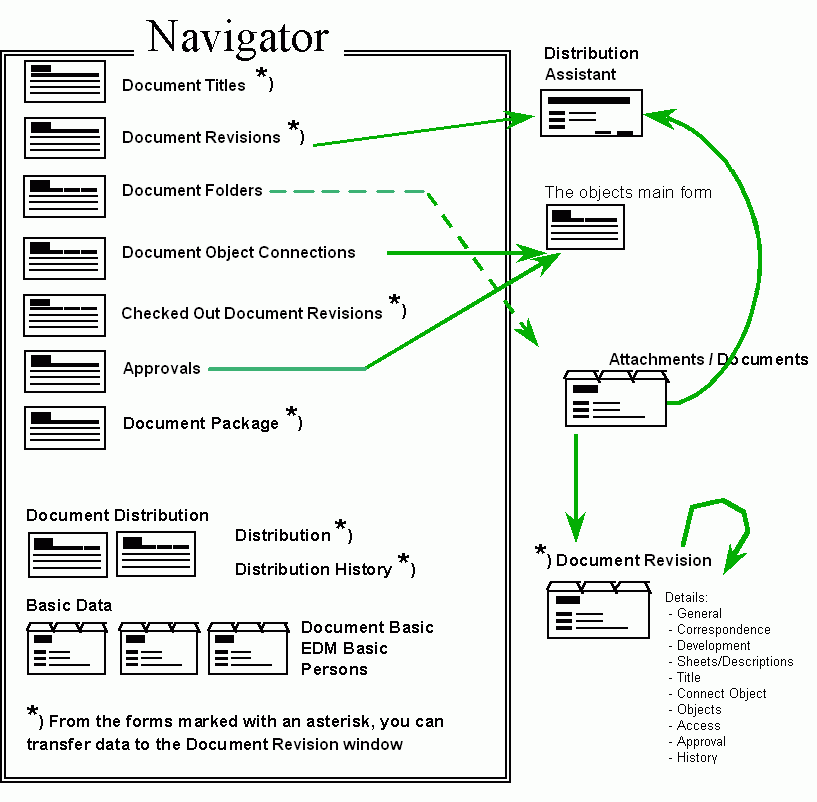
Navigator for Document ManagementThe figure below is an example of the IFS Navigator, which shows the main functionality in the IFS Document Management module. This is where you choose what to work with and obtain detailed information about document titles and revisions by double-clicking on the folders in the Navigator to view the hierarchy. Notice that other functions can be accessed by using the right mouse button option when a window is open.
If you know the author, creation date or class of the document, you can begin searching in the Document Revisions window or in the Document Titles window. From both these windows, you can use the right mouse button option to view the Document Revision window. This provides you with detailed information about the document revision and enables you to perform operations on the document.
Navigation
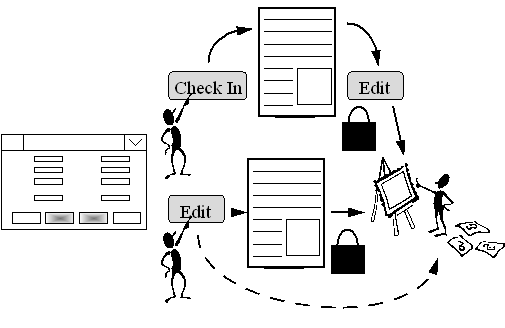
The figure below illustrates different ways of navigating in the application. Most of the operations you can perform on a document are available from the Document Revision window.
Functional Overview of Document
Management
If you are creating a new document, you need to register data about it. Then, you can
connect the document to other objects, enter the document in a structure, and perform
other functions. The status of the document can be changed, and the document can be worked
with according to its new status. In the registration phase, you can also designate whether you want the document to be
routed for electronic approval. If that is the case, all persons in your approval route
must sign the document electronically before the document can be released. The figure below indicates the life cycle of a document with some of the appropriate
operations for each document phase. Operations that are available, but not commonly used
in the particular phase, are marked with an asterisk (*). There are two statuses,
Preliminary/Released and Active/Obsolete. In addition to this, the document can be
Expired. The document expires when it has been obsolete for a designated number of days.
Phase Status Available Operations
Registration Preliminary and Active
- Create approval routing
- Set access control
- Connect documents to objects
- Add document revision in the structure
- EDM: Check In, View, Edit, Print
* Create new revisions
* Set document to obsolete
* Set document as template
* Delete document file (if it exists)
Approval Preliminary and Active
- Enter additions/modify approval routing
- Set access control
- Connect documents to objects
- Add document revision to structure
- Approve routed documents
- EDM: Check In, View, Edit, Print
* Create new revisions
* Set document to obsolete
* Set document as template
* Delete document file (if it exists)
Release Released and Active
- Set access control
- Connect documents to objects
- EDM: View, Print
* Create new revisions
* Set document to obsolete
* Enter document in structure
* Set document as template
Make Obsolete Released and Obsolete
- Set access control
- Delete documents
- EDM: View, Print
* Create new revisions
* Connect documents to objects
* Set document as template
The Document Revision window is the main window in the IFS Document Management module. The window contains related, specified information for a document. One way to access this window is to use one of the available overview windows. Select the records you want to view, then right click and select Document Revision from the menu. A window will appear containing the selected records initially presented with the Document Titles or Document Revisions window.
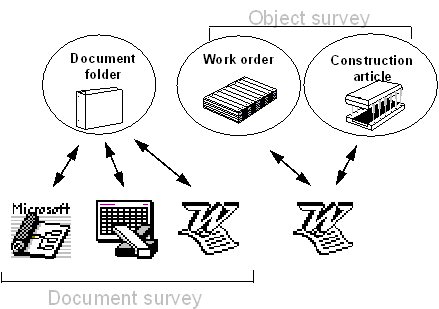
You should be able to easily locate documentation connected to a document folder or other business object when you are working with a particular business object. A service is available throughout IFS Applications for connecting documents to the business object with which you are working.
When you are working with an object and need the documentation connected to it, you can click Documents (available in context pane/attachments) and obtain a survey of all document references for this object. Conversely, when you are working with a document, the system enables you to get a survey of all objects to which this document is connected. The figure below illustrates document survey and object survey.
Approving documents at different phases through a routing process makes the evaluation process more efficient. Information about who has approved a step and when it was approved is always available.
An approval process ensures that all departments/persons affected by those documents have the opportunity to read/edit them. Before approving the document, you can add a comment in the Note column.
Approvals take place according to the routing steps and the persons designated to have required approval privileges. It is possible to set up approval routing templates and connect a routing template to a document issue. (For more information on approval routing templates, see the help for Document Basic/Approval Template tab.) Note that the approval routing is used when setting approval group access for a document revision.
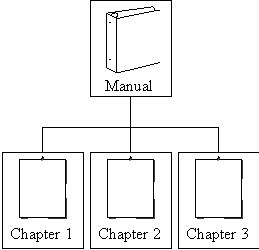
Document structures are very useful when organizing your documents in a hierarchical manner. One document may be the parent of several other documents. Various operations such as View, Edit, Print, Approve and Release can be done on the whole structure.
Note: The progress of a document can be controlled in two different ways. Each revision has its own progress path, allowing you to make changes directly in the Document Revision/Development tab. If the document is in a package, the progress of the revision corresponding to the associate revision type (in the document package) of the document is controlled in the Document Package window.
The Document Package window refers only to the revision of the document corresponding to the associated revision type in the document package. The available associated revision types are Latest Created, Latest Released and Fixed. The progress of a document in a package is determined through a reference to a milestone profile and a milestone, unlike the progress in the Document Revision/Development tab in which you can insert the progress directly. As the document is developed and as new milestones are reached, the milestone level is increased, thus increasing the progress.
To indicate the progress, the package function uses a set of common milestones, each milestone having an associated progress. The milestone progress definition can be changed even if the milestone is used by a document in a package. Typical milestones and their associated progresses are First draft ready (progress 30%), Final images ready (progress 80%), and Completed (progress 100%).
Subscribing
The distribution system is designed to facilitate distribution of copies of the document to different users. A user can select a number of documents and request a copy of these when they are approved.
A list of documents can be distributed to a list of users. Select the document revisions in the Document Revisions window, then use the menu option Document Distribution to launch the Document Distribution Assistant. The Document Distribution Assistant can be opened for a single document by the right mouse button option in the Document Revision window. The wizard will require you to insert the distribution information, including a list of recipients.
Checking and Reading Distributed Documents
The Distribution History window contains a list of all distributions that have been made. The distributed documents have a status. If this status is Hardcopy, the document has not yet been distributed. After you have read a document, set the status to Read. This ensures that the document does not reappear the next time you query for newly distributed documents.
Unsubscribing
You can remove or suspend a distribution request. Enter the Distribution window and either remove the relevant distribution line or use the menu option Suspend to set it to the Suspended status.
The Electronic Document Management (EDM) system is used for handling electronically stored documents.
EDM is built into IFS Document Management to handle the viewing, editing, and printing of electronic documents. EDM also handles the checking in and checking out of documents, incorporating access control to provide security for the documents.
The administrator of the Document Management system has access to the entire document management system and has the sole responsibility to perform maintenance. The administrator must register the EDM applications and the EDM locations, both of which are vital to the document management system’s handling of electronic documents. It is also recommended that the administrator manage the file templates as well.
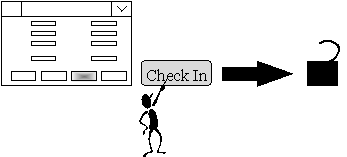
EDM documents are tightly connected to the related document information in Document Revision window or other windows also incorporating EDM. You can edit a document only when you have checked it out from the system by using the Edit button. When you are finished editing, you return it to the system by using the Check In button. You can view and print documents.
When using the Web client to view, edit or check in documents, the file operation can be redirected to the Enterprise Explorer client by configuring the REDIRECT_ WEB_LINKS_TO_IEE default value in the Document Basic/Document Default Values tab.
Note: When using Document Management for the first time, the system will set a local checkout path for you which will be used when editing and viewing documents. By default it will be a folder named IFS under the user's documents folder. The user can change the path manually and the path can be either on your local hard drive or a network drive. When accessing a document stored on a remote storage location, such as FTP, the document is first retrieved and stored in your local checkout path before continuing with the selected operation. The local checkout path is written to the registry of the operating system.
Create a New Document File
To create a new document, click either the Edit or the Check In button in the Document Revision window. If you click the Edit button, you receive either an empty document or a document based on a template. If you click Check In, you must specify an existing file to insert into IFS Document Management. After checking in a new document, you must manually click Edit to edit it; this occurs automatically if you create the document with the Edit button.
Edit a Document File
To begin editing a document, click the Edit button in the Document Revision window. Note that the document is locked for editing by other users until you click the Check In button. The Edit button is active when the document is checked out. This enables you to resume editing a checked-out document by simply pressing the Edit button again.
Check-in a Document File
To check in a document, you must click the Check In button in the Document Revision window. This action will unlock the document, and other users having access rights can now edit the document.
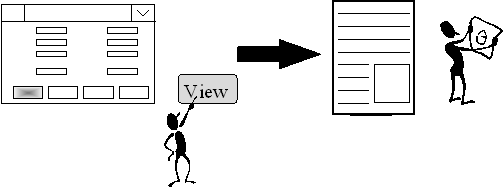
View a Document File
To view a document file, click either the View button or select the View menu selection. You can view the original or the view copy if either is available. You also can view the original document using an external application.
Note: The external viewer application is configured in the User Settings dialog and stored in the Windows registry.
View copy: A copy of the document file saved in PDF format. The copy can be viewed by selecting either the View button or View in the menu.
PDF: Portable Document Format. This is a file format similar to Postscript™, and is the most common format used for viewing view-copies in IFS Document Management. The file format is platform-independent, i.e., it can be viewed independently of the operating system and computer type.
Document file: The document file made by a document creation application, i.e., Microsoft Word.
You can create your own templates and macros using document data from IFS Document Management.
Requirements
Macro blocks written in either J-script or VB-script must be defined in the Macro Basic window.
Result
When a document application is started in IFS Document Management, you can choose whether to run it with or without a macro.
Examining if a file type can be opened for editing
After registering an EDM application, you could get an error message when trying to edit the document. This can occur when your selected application is not associated with the file extension used. To test whether this is the case, use either File Manager or My Computer to execute a file with the same extension as used in EDM Application. If this doesn’t work, you must create an association between the file extension and the application. See your Windows manual for this.
Examining if a file type can be printed
Perform the same test for printing as you did when testing if a file type could be edited. Use either File Manager or My Computer, depending on the Windows version, then select a file and try to print it with the menu command File/ Print. If this works, the file type can also be printed through IFS Document Management print commands.
All reports are initialized and generated from IFS/Info Services. There are four reports available in IFS Document Management:
The objective of this part of the chapter is to provide an overview of the IFS Document
Management system and to explain how to perform some basic tasks.
Before you proceed, be sure that the system is properly installed and that you are
authorized to enter your own data in the database.
General information about the user interface is presented in a separate guide, IFS
Applications General Functions. We advise you to first familiarize yourself with that user
guide in order to facilitate working with IFS Document Management.
In this tutorial, you will use MS Word to create a user manual for one of your own products. You will write it, but the manual must be approved before it can be released. To maintain the document's location within the system, you will connect the manual to a Document Folder. Once the document is released, it eventually becomes outdated. Therefore, a new revision must be created and the obsolete flag placed on the outdated revision.
First, you need to register some basic data. Use the navigator to find the Document Basic window. There are two basic data forms available.
Note: Information in the EDM Basic window is to be maintained by your administrator, and must be present before you can proceed.
In the Document Basic window you can enter your own document class for the user guide. Later, you will use this class to put your first document in the appropriate group.
View the other tabs in this form. Register one approval profile suitable for user guides, and enter the steps in this profile in the Document Basic/Approval Template tab. Remember that the profile can be tailored for each document for multiple approvals. Look in the other chapters of this manual for further information.
To register new document titles, open Document Titles window or the Document Revision window from the Navigator.
You are now ready to register a new document. Use List Of Values to enter the document
class. A document number can be entered or, if left empty, automatically generated. The
default revision is inserted automatically into the revision column. If you want a
revision other than the one shown, you can overwrite it. Remember that you must always
specify a revision because it is not possible to create a document title without a
revision. Finally, you can enter an appropriate title and save the record.
After saving your document, select the new document and choose the menu option
Document
Revision to access the Document Revision window. This is the main
window of this module with
most document operations available here. Each tab represents different properties for the
selected document issue. In this window, you can enter information about document responsibility and other similar
information.
Press Edit to start Word, then write your document. Remember to press Check In
when
finished.
If the application tells you that the view file is required or out of date, you must either make the view copy file or re-define the document title so that the view copy is optional. Disable the view copy option in the Title tab by setting the value of the View Copy field to Optional.
Use the navigator to locate the Document Folders window. In this section you can register a folder, such as the name of the product for which you are creating a user manual. Select Attachments from the context pane to open Documents. In here, you can register the class, number, and revision of the document you have created.
Return to the Document Revision window. Click the Development tab and go to the Approval Templ field. Use List Of Values to find the approval template you entered in the basic data section. When you save this record, all the steps in the approval template will be copied to this document routing. Select the Approval tab to view the approval routing for the selected document. You can modify this route, but the steps cannot be altered after they have been approved. The operation for approving this document is present in the operations menu. Refer to the guide to study the rules for approving a document.
When all steps in the document routing are approved, you can use the right mouse button option in the General tab to release the document. If all requirements set in the document title are met, the document will be released. After you release a document, many operations are no longer available and their menu options are disabled.
Eventually, you may need to create a new revision of the document. Return to the Document Revision window and select the General tab. Select Create New Revision from the right mouse button option. You must enter a new revision number and revision text. There are check boxes that allow you the option to copy the original file, structure, and approval routing from the old revision.
If the first revision of the manual is no longer appropriate, set it to the Obsolete status. Remember to view the Objects tab in the Document Revision window to determine whether the document is connected to any objects. If it is, you may need to update the document revision. If the document connection is registered to Latest Revision in the Update Revision field, it is updated automatically.