Design Report—Exercises
| IMPORTANT |
| The exercise scenarios in this document uses data from the RACE version
of the database released with App75 SP4 as example data. |
Add a standard parameter to your report
Purpose: The purpose of this exercise is to show you how
to create a standard parameter and use this as a filter criteria in your report.
Scenario: For this exercise we will create a standard parameter using Parameter
Type 'DisplayItem'.
Windows:
IFS Business Analytics/Go to Design/Report Book/Parameters
- Open IFS Business Analytics
- Open the report created in Design Basic
Report exercise
- Click Go to Design and click Report Book
- Click Parameters and and select Standard Parameters tab.
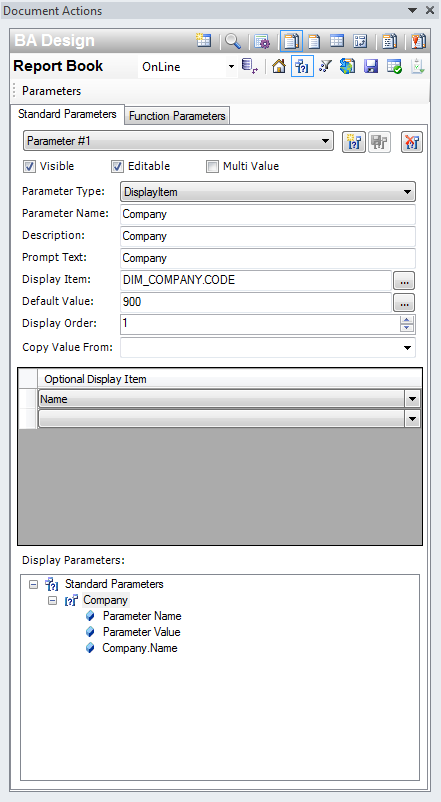
- Select 'DisplayItem' from the List of Values as the Parameter Type.
By default this will be selected.
- Enter Company as the Parameter Name. Note: Spaces are not
allowed when giving a name for the parameter.
- Enter Company as the Description for the parameter.
- Enter Company as the Prompt Text. This is the guide text that
will be used when selecting the parameter values from the executed
report.
- Select Company from Display Item List of Values.
- Select company '900' as the Default Value.
- Select Name as an additional value from the Optional Display Items
List of Values.
- Click Save Parameter.
- Drag Parameter Name, Parameter Value and Company Name from Display
Parameters to cells A1, A2 and B2 respectively. Refer to the figure below:
- Select the report sheet and change the filter criteria to use the
parameter created.
- Click Execute.
- You will be prompted to enter the value for the
company.
Add a function parameter to your report
Purpose: The purpose of this exercise is to show you how to create a function parameter and use this as a filter criteria in your report.
Scenario: For this exercise we will create a function parameter using an 'Advanced Function'.
Windows:
IFS Business Analytics/Go to Design/Report Book/Parameters
- Open IFS Business Analytics.
- Open the report created in Design Basic Report exercise.
- Click Go to Design and click Report Book.
- Click Parameters and select Function Parameters tab
- Click on the New Parameter. By default Advanced Function check box is not selected. Select the Advanced Function check box.
- Enter Year as the Parameter Name.
Note: Spaces are not allowed when giving a name for the parameter.
- Select item Year of dimension Accounting Period from the Display Item List of Values.
- Select Function Id GET_ACC_YEAR from the function id List of Values. The Function Argument section will be updated with arguments Company and Date.
- Select already created Company parameter from the argument Company List of Values.
- Enter 2009/01/01 as the value for the function argument Date.
- Click Save Parameter. Created Parameters group box will be updated with the created parameter.
- Click Evaluate button. You will be prompted to enter the value for the company.
- Use existing value of 900 and click OK. You will get 2009 as the evaluated value for the parameter.

- Select the report sheet and add filter criteria for item Year of Accounting Period dimension (item DIM_ACCOUNTING_PERIOD.ACCOUNTING_YEAR).
- Select operator equals (=)
- For the Condition select the created function parameter Year from the List of Values dialog box
- Click Execute.
Using Zoom In
Purpose: The purpose of this exercise is to show you how
to use Zoom In for a design report.
Windows:
IFS Business Analytics/Design Mode/Zoom In
- Click Go to Design to get back to the design.
- Select Balance
Amount from C6
- Select Zoom In tab and Select Enable Zoom In check
box.
Note: The display area for Zoom In items will be populated for the
relevant data once it is selected. The fields defined as Mandatory to
support the related URL option will be in bold and colored in Red.
Deselecting any one of these items will raise a message stating that the URL
option will be lost. The Display Items included in the design will be in
bold and colored in Green.
- Deselect all other display items leaving Description, Company,
Year Period, Account, Balance, Quantity, Year
and Period.
- Click Execute.
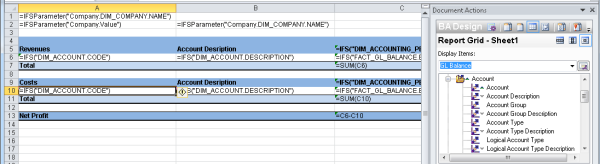
- Select 'Account 4021' in the report and right click and click Select
Zoom In. Refer to the figure below:

Copy design row and add a filter criteria for the design row
Purpose: The purpose of this exercise is to show you how
to copy a design row.
Windows:
IFS Business Analytics/Go to Design
- Click Go to Design to switch to the design.
- For the design row
select
Filter Criteria tab and add a Filter Criteria where Account Type ='REVENUES'.
- Select cell A5 enter 'Revenue' as the title and change the Total in A7
to 'Revenue Total'.
- Select rows 5 to 7 and copy and paste into row 9 to 11.
- Select row 6 right click and select Copy Design Row and paste design row
into row 10.
- Select cell A9 and enter 'Cost' as the title and change the 'Total
Revenue' title to 'Total Cost'.
- Select Filter Criteria tab and select the second design row and change
the account type where Account Type='COST'.
- Add* -1 to cell C6 in order the display the Revenue values as positive
figures.
- Select the fist design row and enter a filter criteria to
exclude(<>) Account 3732. (This is done to make sure that the net profit
does not equal to 0).
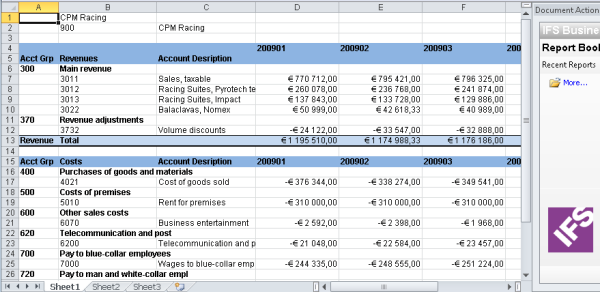
- Add a net profit row in row 13 and add simple formula in
C13(C7-C11)and D13(D7-D11) as shown below:
- Click Execute.
- Save report with name DESIGNXX (where XX is your initials).
Adding a Repeater to the the design row (Optional)
Purpose: The purpose of this exercise is to show you how
to add a repeater level to your repeater.
Windows:
IFS Business Analytics/Go to Design/Repeater
- Open DESIGNXX (the report that was created in the previous exercise).
-
Insert new rows between row 5-6 drag Account Group to
row 6 , select and change the design rows to include the account
group as shown below.
.png)
- Repeat step 2 for the second design row.
- Click
Execute. Refer
to the
figure below:
- Save the report.